| The project/task capture wizard consists of several steps designed to help you identify everything that you are currently working on, need to get done or may need to start in the near future. The Wizard consists of two steps:
|
|
|
| Step 1. Capture
|
|
|

|
|
|
| The capture step helps you to brainstorm all the projects/tasks that are currently on your plate. Consider each prompting question in the box and enter everything that comes to mind. Don't worry about organization, duplicates or whether something is a project, a task or a small action. If you're thinking about it, write it down. You can organize these items in the next step. If there is a deadline associated with the item you can also enter it now.
|
|
|
| After you're done with the current question, use the Wizard | Next Item command (Ctrl+N) to advance to the next question.
|
|
|
| When you are done with all the questions, the Next Item command will take you to step 2.
|
|
|
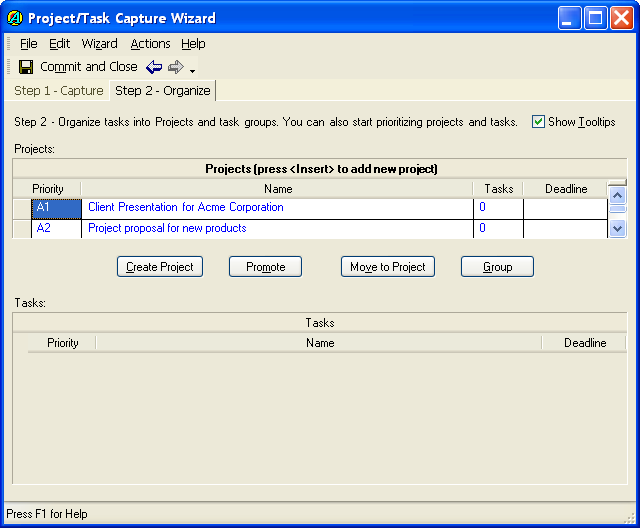
| Step 2. Organizing
|
|
|
|
|
|
| The organization step presents projects and tasks in a split view. The tasks view is grouped by project so you can easily tell which tasks are part of which projects.
|
|
|
| All the items you captured in step 1 are initially placed in the Tasks view. This view allows you to organize them using the four buttons. Here is a process you can use to organize the task items.
|
|
|
| Step 2.1 Identify & Promote Projects. Go through the list of tasks and identify the ones that correspond to top-level outcomes. You can convert these items directly into projects (see Getting Organized Overview) using the Promote button.
|
|
|
| Step 2.2 Process Remaining Tasks. Process the remaining tasks and take one of the following actions for each of them:
|
|
|
| · | If the task is part of a project you've already identified in Step 2.1 (or some other existing project), select the parent project in the projects list (you can select a project by clicking on the row selector button before the priority cell) and click on the Move to Project button. Go through all the other tasks and find all the tasks that are also part of this project and move them into the project.
|
| · | If the task is not part of a project you've identified, ask yourself: "What is the outcome for this task?" If you can think of an outcome, use the Create Project button to create a new project representing the outcome. If you can't think of an outcome maybe the task itself is the outcome? Go through the remaining tasks to see if there are any other ones that belong to the newly created project.
|
|
|
| Step 2.3 Group Tasks. You can use drag/drop and Actions | Record commands to rearrange tasks and projects into a parent/child hierarchy as needed (see Using Grids.) The Group button can also be used to create a new parent task for all the currently selected tasks (if a summary task was missing).
|
|
|
| Step 2.4 Prioritize Projects/Tasks. You can prioritize the projects and tasks at this point or do so later in the projects and tasks views. See Using Priorities for details.
|
|
|
| Once you are done, click on the Commit and Close button to exit the wizard.
|
|
|
| See Also
|
| Getting Organized Overview | Using Achieve | Using Grids | Using Priorities | Projects | Tasks
|
|
|
Copyright (c) 2004-2007 by Effexis Software, LLC. All rights reserved.
Spending too much time drawing sequence diagrams? Try our Sequence Diagram Tool
Other resources
See also Time management and personal goal setting guides to make better use of your time and learn how to set and achieve your important goals.
Time management software : daily planner : goal setting software : definition of time management